Hello! MIB3.NET is a tiny free utility designed for Preh/Joynext manufacture MIB3 or MOI3 infotainment systems.
The primary function is to unlock crucial FEC and SWaP functions, including factory navigation, Apple CarPlay, Android Auto, and Sport HMI.
This project is provided strictly for educational, research, and non-commercial bench-testing purposes.
Installation Guide and Tips
STEP 1: UPGRADING THE SOFTWARE VERSION BEFORE PATCHING
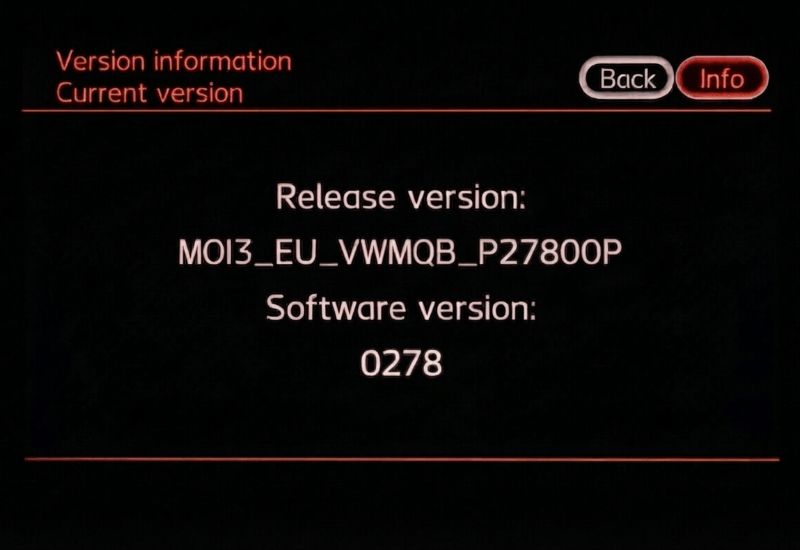
Depending on the update size, the installation process takes between 05-30 minutes. Please ensure that your vehicle is connected to an external power supply during this procedure.Before applying the patch, we need to check if your hardware is up to date. To do this, press and hold the Menu button for a few seconds until the Service mode menu appears, then select Software update/versions. Please confirm your selection to enter Engineering mode by clicking Start update. The infotainment system will restart automatically. Once the system enters Engineering, please select Version Information to view the release and software version. You can see an example software version in the image below.
 Although most users achieve successful results with versions earlier than 0308, we recommend updating to this version or a later one. If your version is 0308 and higher, or if you taking the risk you can proceed to the STEP 3. If your version is incompatible, you need to upgrade your multimedia system using the following order: 0156 ⇢ 0238 ⇢ 0268 ⇢ 0278 ⇢ 0308 ⇢ later versions (0334 is not safe to patch).(Related versions will be shared here soon. For now, please find them via the internet.)
• Find a USB Type-C flash drive with at least 16GB of storage. (A Type-C adapter can also be used.)
• Firmware file appears as 'MOI3_XX_XXMQB_PXXX00P_0XXX.7z' and contains 'Meta' and 'Data' folder. Copy the 'Meta' and 'Data' folders found within the firmware file to the root directory of your USB drive.
• Turn on the ignition, press and hold the Menu button for a few seconds until the Service mode menu appears, then select Software update/versions. • Please confirm your selection to enter Engineering mode by clicking Start update.• The infotainment system will restart automatically. Once the system enters Engineering again, please select Update.• Then, select USB on the media selection screen.• Once your unit has read your USB drive, scroll down the screen and press Start update at the bottom.
• The warning states that the update must not be canceled under any circumstances. Press Start update again to begin the update.
• The unit may restart several times during the update process. Upon completion, please press Resume located at the bottom of the 'Update summary' screen. The unit will be ready after system has restarted!
Although most users achieve successful results with versions earlier than 0308, we recommend updating to this version or a later one. If your version is 0308 and higher, or if you taking the risk you can proceed to the STEP 3. If your version is incompatible, you need to upgrade your multimedia system using the following order: 0156 ⇢ 0238 ⇢ 0268 ⇢ 0278 ⇢ 0308 ⇢ later versions (0334 is not safe to patch).(Related versions will be shared here soon. For now, please find them via the internet.)
• Find a USB Type-C flash drive with at least 16GB of storage. (A Type-C adapter can also be used.)
• Firmware file appears as 'MOI3_XX_XXMQB_PXXX00P_0XXX.7z' and contains 'Meta' and 'Data' folder. Copy the 'Meta' and 'Data' folders found within the firmware file to the root directory of your USB drive.
• Turn on the ignition, press and hold the Menu button for a few seconds until the Service mode menu appears, then select Software update/versions. • Please confirm your selection to enter Engineering mode by clicking Start update.• The infotainment system will restart automatically. Once the system enters Engineering again, please select Update.• Then, select USB on the media selection screen.• Once your unit has read your USB drive, scroll down the screen and press Start update at the bottom.
• The warning states that the update must not be canceled under any circumstances. Press Start update again to begin the update.
• The unit may restart several times during the update process. Upon completion, please press Resume located at the bottom of the 'Update summary' screen. The unit will be ready after system has restarted!
STEP 2: FIXING THE FAULT CODE: B201A00
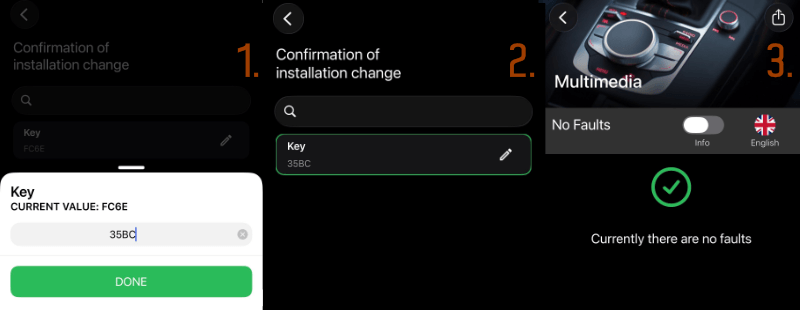
1555 / B201A00 - Check Software Version Management (SVM) is a infotainment system fault. This fault code occurs when you make any software changes to your unit. Following a firmware update of the infotainment main unit, entering a new confirmation code is required to verify the successful completion of the procedure. Please enter the exact value from the 'Confirmation of installation change' screen into the SVM Coder page, and confirm the newly generated value by updating it on the relevant screen.
STEP 3: PREPARING THE PATCH FILES & INSTALLING THE PATCH
 Extract the customized 'MIB3.zip' file you downloaded via the module on the homepage, and copy the 'full.bin' and 'move_map.sh' files and 'Data' and 'Meta' folders found inside to the root directory of your FAT32/exFAT-formatted empty USB drive. Your USB drive is ready! You can now head to your vehicle and repeat the STEP 1 process.
• Turn on the ignition, press and hold the Menu button for a few seconds until the Service mode menu appears, then select Software update/versions. • Please confirm your selection to enter Engineering mode by clicking Start update.• The infotainment system will restart automatically. Once the system enters Engineering again, please select Update.• Then, select USB on the media selection screen.• Once your unit has read your USB drive, scroll down the screen and press Start update at the bottom.
• The warning states that the update must not be canceled under any circumstances. Press Start update again to begin the update.
• The update will take up to approx. 5 minutes. Upon completion, please press Resume located at the bottom of the 'Update summary' screen. The patched functions will be ready after system has restarted!
Notice: Just as in the version upgrade process, you will receive the '1555 / B201A00 - Check Software Version Management (SVM)' fault code in your '5F Control Unit' after the update/patch is installed. Follow the same process in STEP 2.
Extract the customized 'MIB3.zip' file you downloaded via the module on the homepage, and copy the 'full.bin' and 'move_map.sh' files and 'Data' and 'Meta' folders found inside to the root directory of your FAT32/exFAT-formatted empty USB drive. Your USB drive is ready! You can now head to your vehicle and repeat the STEP 1 process.
• Turn on the ignition, press and hold the Menu button for a few seconds until the Service mode menu appears, then select Software update/versions. • Please confirm your selection to enter Engineering mode by clicking Start update.• The infotainment system will restart automatically. Once the system enters Engineering again, please select Update.• Then, select USB on the media selection screen.• Once your unit has read your USB drive, scroll down the screen and press Start update at the bottom.
• The warning states that the update must not be canceled under any circumstances. Press Start update again to begin the update.
• The update will take up to approx. 5 minutes. Upon completion, please press Resume located at the bottom of the 'Update summary' screen. The patched functions will be ready after system has restarted!
Notice: Just as in the version upgrade process, you will receive the '1555 / B201A00 - Check Software Version Management (SVM)' fault code in your '5F Control Unit' after the update/patch is installed. Follow the same process in STEP 2.
WARNINGS & TIPS
• The patch file is specifically prepared for your VCRN code and is intended for use on a single vehicle only. Modifying the content of this custom-made file with a different VCRN will render the patch inoperable. You can download a new patch by entering the desired VCRN through the module.
• You can update the navigation database (requires VIN number) via the VW, Skoda, and Seat update portals.
• To use the map on both the dashboard and the multimedia screen simultaneously, go to the 5F Multimedia control unit. Then, search for 'Dashboard Display Configuration' under 'Adaptation' menu. Select 'NO' for the 'ability_switch_nav_maps' setting.